First, there was a pitiful looking "behind the couch" table that was in their basement. I loved the overall shape of the table, but it was covered in dust and mildew. I took the table home and scrubbed it with Lysol wipes until it was totally clean.
I went to Lowes and bought interior semi gloss Valspar paint in a very dark gray. I actually didn't even prime this table (even though it probably would have been best to do that). I simply started brushing the gray on the legs on the table and using a paint roller for the top of the table. After I started painting the table, I could see indentations in the top of it where it looks like people used it to write on at some point. After my mom looked at it, she thinks it might have been my great grandmothers table, who I am named after. That gave the table a whole new meaning to me!
It took about 5 coats of paint before the entire table was a solid color,
but I was totally thrilled with the finished product!
Painting a China Cabinet
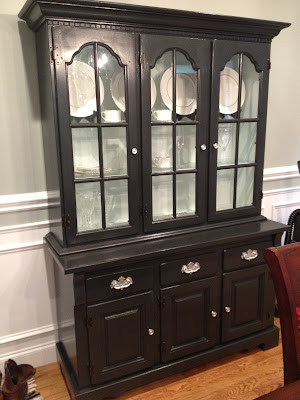
After I saw that the table went well, I started on the China cabinet. The wood on the cabinet had just a normal stained wood finish. It wasn't TERRIBLE, but it just wasn't what I had in mind for my dining room. The pulls on the doors and drawers were also a very 80's bronze color. (You can see both pieces of the China cabinet behind the table in the picture above).The first thing I did was take all of the knobs and pulls off of the cabinet. Then, I cleaned it inside and out with more Lysol wipes (These are always my go-to cleaning product!) I also removed the glass from the doors of the China cabinet.
Once again, I did not prime this piece of furniture. I would probably recommend doing that, if I were to do it all over again. I had to put numerous coats on the China cabinet for it to look universally the same color. I used the same interior semi gloss Valspar paint in a dark gray color for the entire outside of the of the cabinet. I removed the drawers and used a paint roller to paint the front of the cabinet drawers. I also used a paint roller for the sides of the cabinet and anywhere else that I could get by with using it, and for the other areas, I used a regular paint brush.
After I had the outside painted, I wanted to do something different for the inside of the China cabinet. So, I decided to go with a different color to contrast against the dark gray. I had some of our master bathroom color left over that is a pale mint (Delicate Mist is the name of it). I painted the entire inside Delicate Mist and once again, it took several coats of paint to cover it completely.
After I had the entire China cabinet painted, I knew that I did not want to put the dated bronze knobs back on it. At first I thought about buying all new knobs. But, I really liked the over all shape of the knobs and was probably going to end up buying something similar in a chrome or silver color. So, I decided to be crafty with the original knobs. My dad had aluminum/chrome motor paint in his garage, that he uses on his car projects. I decided to just give it a try! After I started spraying them, I fell in love with the color! They look brand new and even look like they were made that way.
The Finished Product


