Friday, December 9, 2016

12.9.16 Friday Favorites - Greenville, SC Inspired

For this week's Friday Favorites, I've decided to choose a few people and companies in the Greenville area, who have really stood out to me lately.  I feel like the Upstate of South Carolina has so many wonderfully talented people!  There's no way that I could share all of my favorites in one post.  So, I'll definitely be writing more Greenville and South Carolina Friday Favorites soon!

As always, here's my list of things that have caught my eye and made me swoon throughout this week.  


1. Emilie @emsnails__

I am always amazed at what this girl can do with nails!  Each image that Emilie shares is honestly like a piece of art that you carry around on your hands for weeks!  With over 5k followers on Instagram, she's an inspiration to nail artists and salons throughout the United States!  Amazing work, Emilie!


2. Pen and Basil

I've been following Kristin Brooks with Pen and Basil for a while and it inspires me to want to do calligraphy. (Even though I have a hard enough time writing anything in cursive!)  Her work is so beautiful and I love what she has been creating for the Christmas season!  She also made the most adorable gift tags for the holidays.  I absolutely love this watercolor, Joy to the World, wreath print!


3. Goose Feathers Boutique

Last month, I visited Goose Feathers Boutique in Travelers Rest for the first time.  There are so many adorable dresses and home goods throughout the store!  They're always getting new stock in too, so you never know what you might find!  Go check out Goose Feathers and make sure to pet her sweet dog, Amos!  Plus, be sure to pick up one of my brush stroke paintings, which are featured in the store!  :)


4.  Clayton Tile

Clayton Tile on Woodruff Road in Greenville, has such an awesome selection of any kind of tile you could ever think of and they always share the most dreamy tiles on their Instagram page!  If you're thinking of adding tile to your home, definitely check them out!  Last year, we added a subway tile backsplash to our kitchen and we got our tile from Clayton Tile.  They were wonderful and so helpful.  I love following their page for tile inspiration!


5. The Adorned Fox

I am so amazed at what people can do with wood burning art!  I had no idea how gorgeous this art form could be, until the last couple of months!  Tabathia with the Adorned Fox has taken girl boss to a whole new level!  She's rocking out all different kinds of hand lettering and wood burn art. She has all sorts of t-shirts and goodies on her Etsy shop as well.  Way to go Tabathia!
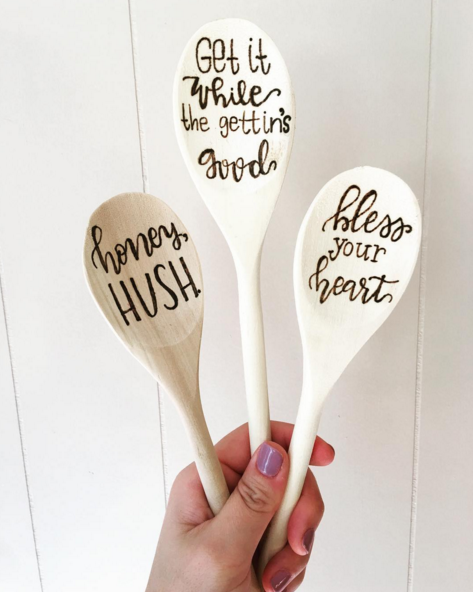


6.  Liquid Catering


I think the idea of Liquid Catering is so awesome!  We had them provide beer and wine at our wedding reception in 2014 and they were amazing!  It's also awesome that they put drink inspirations on their Instagram page!  Yay for cocktail recipes and yay for Liquid Catering of Greenville!  


Tuesday, December 6, 2016

DIY Flocked Wreath


I am totally loving the look of all of these flocked Christmas trees and wreaths this year!  So, I decided to create flocked wreath for my front door.

I went to Hobby Lobby to buy the supplies that I needed for the wreath, including the flock spray.  I already had the plaid ribbon that I used for the bow, seen in my mirror post here.

This is the greenery wreath that I used.  I got it at Hobby Lobby, for only $5!


Here is the snow/flock spray that I used.  It was only $2.50 after the 50% off all of the Christmas items at Hobby Lobby.


I took the wreath outside to spray it and held the sprayer closer and farther away as I moved across the entire wreath.  I didn't want the wreath to be completely white.  I just wanted it to look like it had a dusting of snow on it.  

Here's what it looked like after I finished spraying it.


When I finished spraying the wreath, I let it dry for about 40 minutes.  It will still come off all over everything, so be careful!  

Then, I decided to make another bow, like the one I created for my dining room.  

Check out this blog post for the video that I used to make the bow.


Here's how the wreath looked before I hung it on my front door.


Here's the finished product.  I love how it turned out!  I can't wait to start flocking other Christmas projects now!  


Sunday, December 4, 2016

DIY - How to Hang a Wreath from a Mirror


I've seen all of these gorgeous pins and posts lately with beautiful green wreaths attached to mirrors in living rooms and dining rooms and I just fell in love with that look!  Since I would consider myself quite the DIYer, I thought I would attempt it!

Well, hanging a wreath to a mirror wasn't quite as easy as I thought it would be originally.

Our dining room mirror is attached to the wall with two nails and two hooks on back of the mirror.  At first, I thought I would just attach a string and the ribbon to the wiring at the back of the mirror...  So, that totally messed up that plan.

After some thinking and Googling, I decided to get some 3M Command Strip Hooks.  I probably won't always want a wreath over this mirror throughout the year.  So, I didn't want to cause any damage to the wall or to the mirror. Therefore, hanging it directly above the mirror frame on the wall, was the easiest thing to do.

So, I went to  the store and found these little guys.


First, I measured the width of the framed mirror, because I wanted to make sure that the wreath was centered.  I measured it as close to  the top of the frame that I could. After I found the center point of the mirror, I used chalk and made a small dot on the wall right above the mirror to mark the center point.  

Next, I used two of the Command hooks, since they are only good for 1/2 of a pound each, I wanted to make sure that the hooks would hold the wreath.  I put a Command Strip on the wall on the left side of the chalk mark and I put another command strip on the right side of the chalk mark.  (Make sure to follow the instructions that come with the Command Strips).  After you attach the hooks, apply pressure to the hooks for 30 seconds each, to make sure that they are adhered correctly to the wall.  

Now, I needed  to attach the ribbon around the wreath and then create a bow to cover up the hooks on the top.  I simply cut one strip of ribbon to loop around the bow, for it to hang at the appropriate length, in the middle of the mirror.  I honestly, just eyeballed this part and didn't measure.  (I hate to measure anything if I can get by with it!)  Then, I used two safety pins to quickly attach the ribbon at both ends, for a sturdy and seamless loop.  You could definitely stitch up the ends to make a loop, but I wanted this to be as easy to remove as possible and didn't want to waste my plaid ribbon, when I changed it out.  Hey, I'm thrifty!


For the next step, I needed a bow to cover up the small Command hooks above the mirror.  I found this awesome video by Michaels on YouTube and used it to create the plaid bow.  Where she uses pipe cleaners to attach the bow together, I used floral wire.  Surprisingly, I have no pipe cleaners in all of my craft stuff!  So, I just cut off about an eight inch piece of craft/floral wire to wrap around the bow and secured it in the back like you would a twist tie.  This excess will be what you attach the bow to the original loop that you created and the hooks, so make sure that you wrap it around and it is pulled tight in the back of the bow.  


You can see in the picture above, where I wrapped the wire around and looped it around throughout the back of the bow.


I am so happy with the finished product! No, it wasn't as easy as I thought it was going to be, but it looks beautiful for the Christmas season, and its nothing permanent that did any damage to the wall or mirror!  Happy decorating and DIYing friends!


Check out my next post on my first wreath flocking experience!


Follow me on Instagram for more shots of my Christmas decorations!