Wednesday, July 15, 2015

My first attempt at #DIY Painting Furniture

When my aunt was cleaning out my great aunt and uncle's house, I was so excited to be able to have some of their furniture pieces for my new house.  Growing up, we were all very close and I knew I would cherish the opportunity to have some of their heirlooms.

First, there was a pitiful looking "behind the couch" table that was in their basement. I loved the overall shape of the table, but it was covered in dust and mildew.  I took the table home and scrubbed it with Lysol wipes until it was totally clean.

I went to Lowes and bought interior semi gloss Valspar paint in a very dark gray.  I actually didn't even prime this table (even though it probably would have been best to do that).  I simply started brushing the gray on the legs on the table and using a paint roller for the top of the table. After I started painting the table, I could see indentations in the top of it where it looks like people used it to write on at some point.  After my mom looked at it, she thinks it might have been my great grandmothers table, who I am named after.  That gave the table a whole new meaning to me!


It took about 5 coats of paint before the entire table was a solid color, 
but I was totally thrilled with the finished product!

Painting a China Cabinet

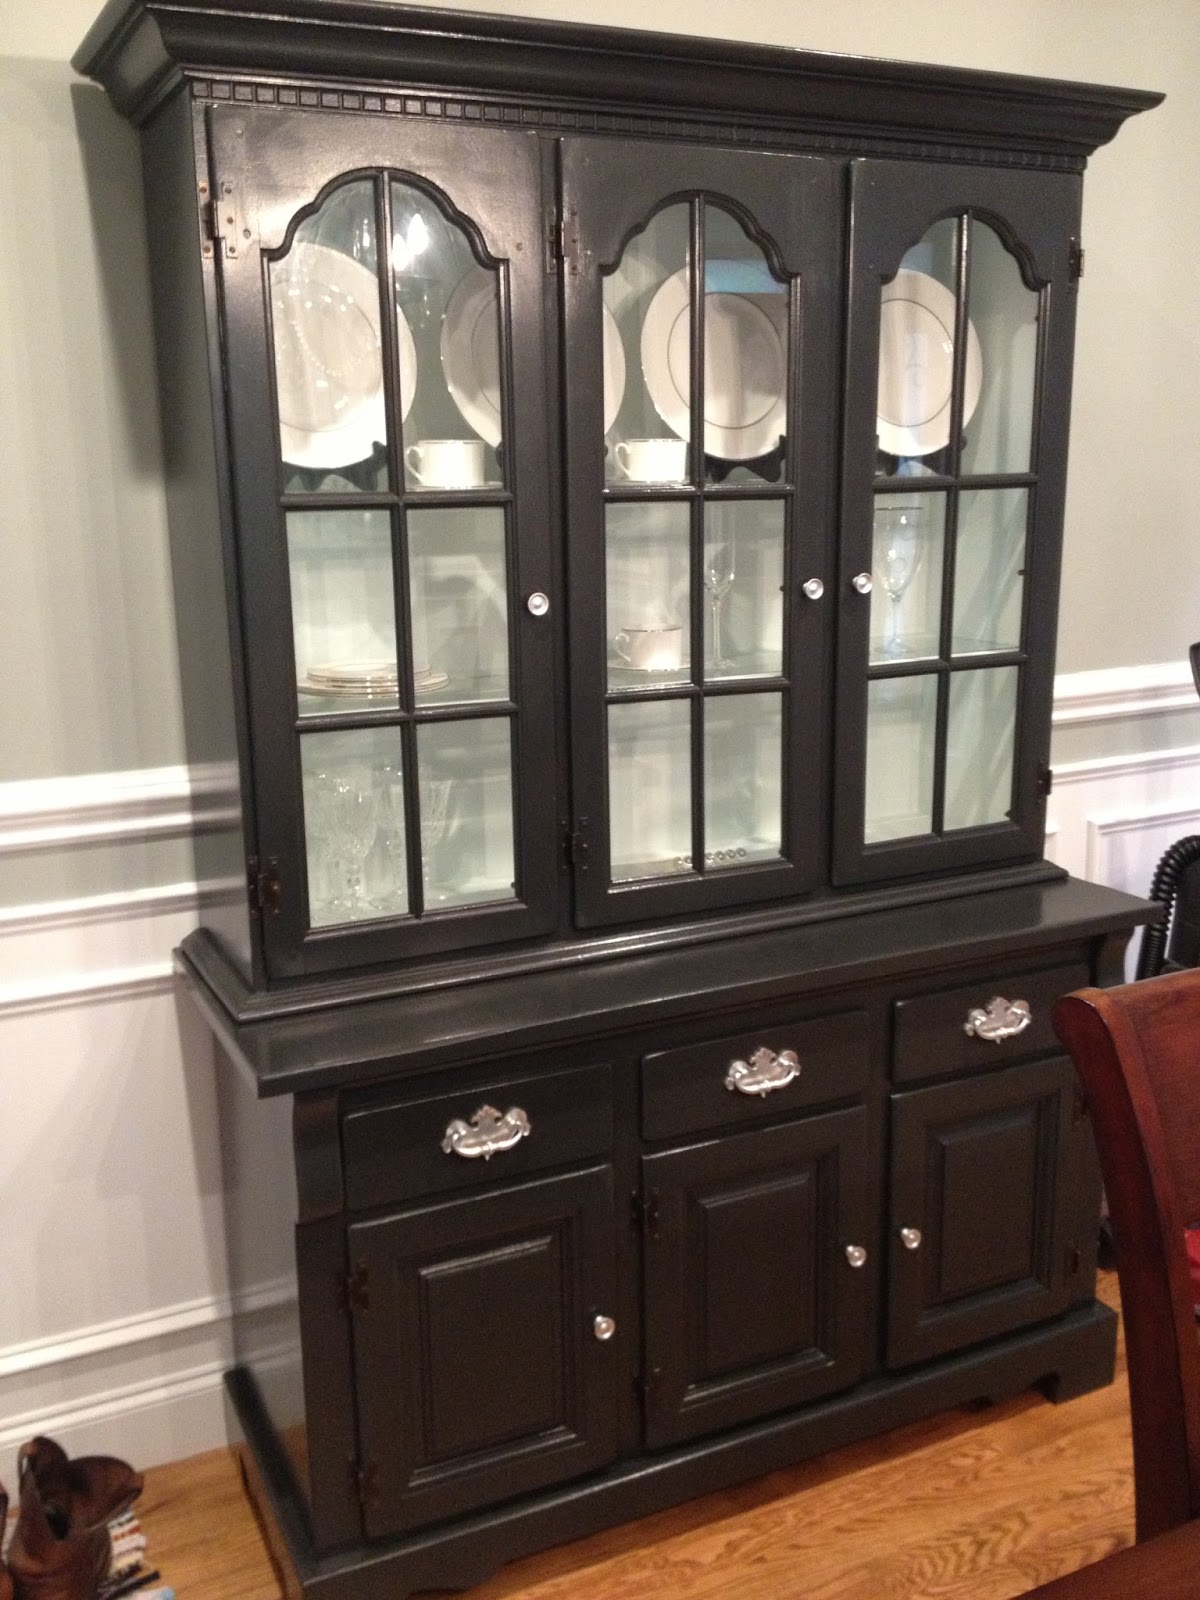
After I saw that the table went well, I started on the China cabinet.  The wood on the cabinet had just a normal stained wood finish.  It wasn't TERRIBLE, but it just wasn't what I had in mind for my dining room.  The pulls on the doors and drawers were also a very 80's bronze color.  (You can see both pieces of the China cabinet behind the table in the picture above).

The first thing I did was take all of the knobs and pulls off of the cabinet.  Then, I cleaned it inside and out with more Lysol wipes (These are always my go-to cleaning product!)  I also removed the glass from the doors of the China cabinet.

Once again, I did not prime this piece of furniture.  I would probably recommend doing that, if I were to do it all over again.  I had to put numerous coats on the China cabinet for it to look universally the same color.  I used the same interior semi gloss Valspar paint in a dark gray color for the entire outside of the of the cabinet.  I removed the drawers and used a paint roller to paint the front of the cabinet drawers.  I also used a paint roller for the sides of the cabinet and anywhere else that I could get by with using it, and for the other areas, I used a regular paint brush.

After I had the outside painted, I wanted to do something different for the inside of the China cabinet. So, I decided to go with a different color to contrast against the dark gray.  I had some of our master bathroom color left over that is a pale mint (Delicate Mist is the name of it).  I painted the entire inside Delicate Mist and once again, it took several coats of paint to cover it completely.


After I had the entire China cabinet painted, I knew that I did not want to put the dated bronze knobs back on it.  At first I thought about buying all new knobs.  But, I really liked the over all shape of the knobs and was probably going to end up buying something similar in a chrome or silver color.  So, I decided to be crafty with the original knobs.  My dad had aluminum/chrome motor paint in his garage, that he uses on his car projects.   I decided to just give it a try!  After I started spraying them, I fell in love with the color!  They look brand new and even look like they were made that way.


The Finished Product


Wednesday, July 8, 2015

Kids or No Kids? That is the question.

Is it okay to have an adults only wedding?


This has been a hot topic on social media lately.

When we got married on October 25, 2014, we decided to have an adults only wedding and this was a huge surprise to some friends and family members.  However, a wedding is an adult event.  Two people who love each other are joining their union in front of their friends and family.  Who wants an interruption during that?

On our wedding invitations, we simply added "Adult reception to follow."  This gave our guests the hint that children were not invited, and anyone who had a question about it, called us.  Honestly, the majority of our wedding guests with children were excited to have a date night with their spouse. However, we did have a few friends and family members whose feelings were hurt because of this.

Just because we asked for no children to be there, does not mean that we hate your kids!  I like children and Lord willing, I want to have children some day!

I've just always thought that children can be an overall distraction at weddings.
They cry during the ceremony...
They get in the aisle and walk around during the ceremony...  (Don't even get me started on flower girls and ring-bearers that stop in the aisle and cry for 10 minutes while every one thinks its just so adorable. NO.  IT'S NOT CUTE!).
They stick their fingers in the wedding cake...
Their parents aren't watching them...
They throw a tantrum when they don't catch the bouquet...  (I may have done this at my Uncle's wedding approximately 24 years ago)...
Nonetheless! They can often be a distraction from the wedding as a whole.

Some people suggest that you should offer childcare for the individuals who have children and want to come to your wedding.  My response to that is...  No! Weddings are EXPENSIVE to begin with. Why should I pay for a babysitter for your child or children?  We are already paying for your alcohol, meal, dessert, entertainment, and a gift (favors) for YOU for the evening.  So, no, I don't want to pay for someone to take care of your child too.

Don't get me wrong, if you want to have children at your wedding, that's ok!  It is YOUR wedding day and it is YOUR prerogative to decide what you want.  Just don't let someone make you feel bad for the decision you choose.

For us, it was the best decision we could have made!  If we offended anyone, I'm sorry.  We had our perfect wedding of our dreams with no distractions.  No flower girls.  No ring-bearers.  No interruptions.  No regrets!


Wednesday, July 1, 2015

As for me and my house, we will serve the Lord

Don't worry about anything; instead pray about everything.  Tell God what you need and thank Him for all He has done.  Then, you will experience God's peace, which exceeds anything we understand.  His peace will guard your hearts and minds as you live in Christ Jesus.  - Philippians 4:6-7.


For years, I had this verse taped to the bottom of my computer screen at work.  This verse has gotten me through a lot in the past several years...  Dad's emergency open heart surgery, grad school, losing jobs, mom's colon cancer, and the death of my cousin.  When I was asked to speak at his funeral, I knew that this verse needed to be included in whatever the Lord put on my heart to say.  

When we were in the process of construction on our home, I knew that I wanted to write this verse somewhere on the wood, before the sheet rock was installed.  So, my husband and I decided to compile a list of verses that we wanted to write throughout the house. 


We wanted this as a reminder that the foundation of our house was the Lord.  If it wasn't for God, we wouldn't be here, and we wouldn't have been blessed to build this home and our relationship through Him.  

Monday, June 29, 2015

Our General Contracting Experience

Last summer, we started construction on our new home, while planning a wedding.

What were we thinking??

We also acted as the general contractor for the house.  So, all of the decisions, planning and coordination was solely our responsibility.  There were definitely times that I wasn't sure if we would kill each other, let alone, make it down the aisle!

Acting as general contractor for a house, was one of the most demanding and stressful things that I've ever taken on.  I've said numerous times, I'm surprised that I didn't have a stroke or heart attack by the time it was all said and done.  However, we learned so much about ourselves during the whole process and I wouldn't change the way that we did it.


Here are some things that we learned throughout our construction process:

COMMUNICATE!  

If you are building a house together, make sure that you communicate with one another. Relationships of any kind are hard, but talking through things and working together makes everything flow more smoothly.  Plus, if you can't actively communicate with your partner, you're not going to be able to explain things to your contractors.   Make sure that you communicate with them on a regular basis.  Be there as often as you can while they are working.  Trust me.  They will screw something up... and maybe multiple times.  You have to be there to guide and direct them if you want something done right. I printed pictures off of Pinterest that I liked and had them lamented.  I nailed them to a stud in each room during the construction process to show the contractors exactly what I was looking for.  That way, if something doesn't verbally explain what you are thinking, the pictures will help.

Make sure to create a list to divvy up responsibilities.

There wasn't anything more frustrating than having to say, "I thought you were going to contact them!!" Create duties and tasks that each person is supposed to do.   Write down in a notebook what the contractors do, their name, and contact information.  Sit down once a week and go over who is going to contact who, and be specific!  Take notes about the specifics of the conversation and share them with your husband or wife.


Plan ahead

When we contacted our framer, to get on schedule with the building process, it was nice Spring weather.  However, with a delay in getting the lumber and then his schedule suddenly booming, we were lower on his list than we originally planned.   Our lumber ended up sitting on the ground for a month before it was actually used to form a house!  In the mean time, the weather made a turn for thr worst, it rained every single day, which held him back even more.  So, plan ahead!  Make sure that you are in constant contact with your builder/framer and the vendors in which you are getting your supplies.  Or, better yet, let your framer get the materials for you on his account and pay him directly.  (This may cost a little more, but at least it will all be consistent).  Also,  GET A DUMPSTER!  If you are acting as the general contractor, you do not have to legally get a dumpster.  We were thinking we might not need it if we stayed on top of taking the trash and building scraps off ourselves.  WRONG! It may cost you a pretty penny, but do yourself a favor and rent a dumpster throughout your building process.  If not, you will be in for a HUGE pile of mess!

Create an organized filing system.

Keep track of EVERY invoice, receipt, correspondence, etc.  I can't tell you how many times vendors and contractors came back with changing the price of things.   Don't fall for it!   Stay on top of EVERYTHING that you pay for and triple check everything before any order is placed.   (We went 2 months without a front door, because the vendor ordered the wrong one.  Then, we switched vendors, and they ordered the wrong size and blamed us. We ended up having to put up plywood.  It looked like we were planning for a hurricane for months...).  

Get references on your contractors.

We had some AWESOME contractors during our process.  We also had some that I might not pee on if they were on fire... Bless their hearts!  But!  Nonetheless...  Make sure you do research on your contractors.  Contact your friends and family to see who they have used for different projects.  Word of mouth is the best way to get information on a contractor's work AND work ethic.  

Be prepared to fire people.  

If you are hiring all of the contractors, be prepared to fire some.  Sometimes people don't do a job like they are supposed to, and sometimes personalities just clash.   It's never easy to have to tell someone that they are finished with a job, before they are actually "finished" with a job.  But, remember, this is YOUR money that you are spending and you trusting someone to do what they are being paid to do, in a reasonable amount of time. 

Breathe

It will all be said and done, eventually!  Some of the break downs and freak outs that I had during the process, seem somewhat minor now.  At the time, you would think the world was ending!!   Are there still things I would have done differently?   Absolutely!   Are there still things that need to be done with the house now?  Absolutely!   But, at the end of the day, my best friend and I built a house together that we can call our own.


Wednesday, June 10, 2015

"Pardon me, can I prune your hydrangea bush?"


I always knew that I wanted to use hydrangeas for the wedding bouquets and centerpieces.  Since I made the boutonnieres ahead of time, I thought it would be great to go ahead and make the bouquets and centerpieces early too.   That was until I found out how much it cost to buy decent fake hydrangea stems...   So, I decided to talk with local florists on buying the stems and arranging them myself.  $10.00 for 1 stem?  No thanks!   I quickly found out that the best place to buy hydrangea stems (and any type of flower really) is Costco!   You can order flowers online and have them delivered.  Or, you can pick them up at your local Costco.  

A few days before the wedding, I decided to chance it in hopes that Costco (or Sams) would have blue and white hydrangea stems, white roses, and baby's breath...  Which is totally not like me... The worst case scenario plan ahead type of person that I am.

However, two days before the wedding, my future husband called and said "You're not going to believe this, but there is a huge blue hydrangea bush in full bloom outside of a company close to my work!"  (It is very unusual for hydrangeas to bloom in South Carolina at the end of October).

The day before the wedding, my mom and I got some hedge trimmers, buckets, and sweet southern charm, and went to the company.  I walked into the office, told them I was getting married the next day, and asked if I could possibly trim some of the blooms off of their hydrangea bush.  They told me to go for it.  And boy did I!  These bushes were FILLED with huge blue blooms.  I completely packed the entire back of my car and the bushes still had plenty of blooms on them (I wish I had taken a picture!).  Some friends of ours also let us cut some of their hydrangeas.  They had several bushes that had different colored blooms on them.  (See below)


I used these as centerpieces for the bridal party tables. 


The night before the wedding, after our rehearsal, my mom, one of my bridesmaids, my aunt (wedding director), and I, all worked in my parent's garage making the bouquets until 11:30.  We cut the stems to the desired length, bunched them together, wrapped them with sticky floral tape (like used for the boutonniere tutorial), wrapped ribbon around them, and used pearl straight pins down the side for extra hold and decorative purposes. 


For the mothers and grandmothers, I simply used one hydrangea bloom stem and tied a bow around it with ribbon in the wedding colors.  Simple and pretty!


We did purchase the white roses (Costco) and baby's breath (Ingles grocery store) and spent a whopping $35 total on all of the flowers for the ceremony and reception.  

You don't have to spend a ton on flowers!  It isn't necessary!  


There are plenty of gorgeous flowers and greenery options that you can use in your area.  Don't buy greenery!  Trim some hedges and cut blooming branches off of trees.  You're saving money by doing this and you have the added bonus of doing yard work at the same time!  :)