Monday, June 29, 2015

Our General Contracting Experience

Last summer, we started construction on our new home, while planning a wedding.

What were we thinking??

We also acted as the general contractor for the house.  So, all of the decisions, planning and coordination was solely our responsibility.  There were definitely times that I wasn't sure if we would kill each other, let alone, make it down the aisle!

Acting as general contractor for a house, was one of the most demanding and stressful things that I've ever taken on.  I've said numerous times, I'm surprised that I didn't have a stroke or heart attack by the time it was all said and done.  However, we learned so much about ourselves during the whole process and I wouldn't change the way that we did it.


Here are some things that we learned throughout our construction process:

COMMUNICATE!  

If you are building a house together, make sure that you communicate with one another. Relationships of any kind are hard, but talking through things and working together makes everything flow more smoothly.  Plus, if you can't actively communicate with your partner, you're not going to be able to explain things to your contractors.   Make sure that you communicate with them on a regular basis.  Be there as often as you can while they are working.  Trust me.  They will screw something up... and maybe multiple times.  You have to be there to guide and direct them if you want something done right. I printed pictures off of Pinterest that I liked and had them lamented.  I nailed them to a stud in each room during the construction process to show the contractors exactly what I was looking for.  That way, if something doesn't verbally explain what you are thinking, the pictures will help.

Make sure to create a list to divvy up responsibilities.

There wasn't anything more frustrating than having to say, "I thought you were going to contact them!!" Create duties and tasks that each person is supposed to do.   Write down in a notebook what the contractors do, their name, and contact information.  Sit down once a week and go over who is going to contact who, and be specific!  Take notes about the specifics of the conversation and share them with your husband or wife.


Plan ahead

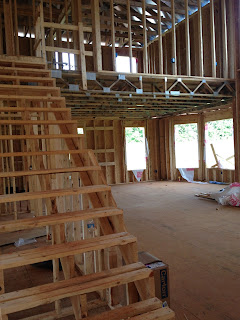
When we contacted our framer, to get on schedule with the building process, it was nice Spring weather.  However, with a delay in getting the lumber and then his schedule suddenly booming, we were lower on his list than we originally planned.   Our lumber ended up sitting on the ground for a month before it was actually used to form a house!  In the mean time, the weather made a turn for thr worst, it rained every single day, which held him back even more.  So, plan ahead!  Make sure that you are in constant contact with your builder/framer and the vendors in which you are getting your supplies.  Or, better yet, let your framer get the materials for you on his account and pay him directly.  (This may cost a little more, but at least it will all be consistent).  Also,  GET A DUMPSTER!  If you are acting as the general contractor, you do not have to legally get a dumpster.  We were thinking we might not need it if we stayed on top of taking the trash and building scraps off ourselves.  WRONG! It may cost you a pretty penny, but do yourself a favor and rent a dumpster throughout your building process.  If not, you will be in for a HUGE pile of mess!

Create an organized filing system.

Keep track of EVERY invoice, receipt, correspondence, etc.  I can't tell you how many times vendors and contractors came back with changing the price of things.   Don't fall for it!   Stay on top of EVERYTHING that you pay for and triple check everything before any order is placed.   (We went 2 months without a front door, because the vendor ordered the wrong one.  Then, we switched vendors, and they ordered the wrong size and blamed us. We ended up having to put up plywood.  It looked like we were planning for a hurricane for months...).  

Get references on your contractors.

We had some AWESOME contractors during our process.  We also had some that I might not pee on if they were on fire... Bless their hearts!  But!  Nonetheless...  Make sure you do research on your contractors.  Contact your friends and family to see who they have used for different projects.  Word of mouth is the best way to get information on a contractor's work AND work ethic.  

Be prepared to fire people.  

If you are hiring all of the contractors, be prepared to fire some.  Sometimes people don't do a job like they are supposed to, and sometimes personalities just clash.   It's never easy to have to tell someone that they are finished with a job, before they are actually "finished" with a job.  But, remember, this is YOUR money that you are spending and you trusting someone to do what they are being paid to do, in a reasonable amount of time. 

Breathe

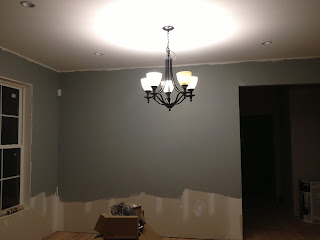
It will all be said and done, eventually!  Some of the break downs and freak outs that I had during the process, seem somewhat minor now.  At the time, you would think the world was ending!!   Are there still things I would have done differently?   Absolutely!   Are there still things that need to be done with the house now?  Absolutely!   But, at the end of the day, my best friend and I built a house together that we can call our own.


Wednesday, June 10, 2015

"Pardon me, can I prune your hydrangea bush?"


I always knew that I wanted to use hydrangeas for the wedding bouquets and centerpieces.  Since I made the boutonnieres ahead of time, I thought it would be great to go ahead and make the bouquets and centerpieces early too.   That was until I found out how much it cost to buy decent fake hydrangea stems...   So, I decided to talk with local florists on buying the stems and arranging them myself.  $10.00 for 1 stem?  No thanks!   I quickly found out that the best place to buy hydrangea stems (and any type of flower really) is Costco!   You can order flowers online and have them delivered.  Or, you can pick them up at your local Costco.  

A few days before the wedding, I decided to chance it in hopes that Costco (or Sams) would have blue and white hydrangea stems, white roses, and baby's breath...  Which is totally not like me... The worst case scenario plan ahead type of person that I am.

However, two days before the wedding, my future husband called and said "You're not going to believe this, but there is a huge blue hydrangea bush in full bloom outside of a company close to my work!"  (It is very unusual for hydrangeas to bloom in South Carolina at the end of October).

The day before the wedding, my mom and I got some hedge trimmers, buckets, and sweet southern charm, and went to the company.  I walked into the office, told them I was getting married the next day, and asked if I could possibly trim some of the blooms off of their hydrangea bush.  They told me to go for it.  And boy did I!  These bushes were FILLED with huge blue blooms.  I completely packed the entire back of my car and the bushes still had plenty of blooms on them (I wish I had taken a picture!).  Some friends of ours also let us cut some of their hydrangeas.  They had several bushes that had different colored blooms on them.  (See below)


I used these as centerpieces for the bridal party tables. 


The night before the wedding, after our rehearsal, my mom, one of my bridesmaids, my aunt (wedding director), and I, all worked in my parent's garage making the bouquets until 11:30.  We cut the stems to the desired length, bunched them together, wrapped them with sticky floral tape (like used for the boutonniere tutorial), wrapped ribbon around them, and used pearl straight pins down the side for extra hold and decorative purposes. 


For the mothers and grandmothers, I simply used one hydrangea bloom stem and tied a bow around it with ribbon in the wedding colors.  Simple and pretty!


We did purchase the white roses (Costco) and baby's breath (Ingles grocery store) and spent a whopping $35 total on all of the flowers for the ceremony and reception.  

You don't have to spend a ton on flowers!  It isn't necessary!  


There are plenty of gorgeous flowers and greenery options that you can use in your area.  Don't buy greenery!  Trim some hedges and cut blooming branches off of trees.  You're saving money by doing this and you have the added bonus of doing yard work at the same time!  :)  

Tuesday, June 9, 2015

DIY Cotton Boutonnieres


The boutonnieres were one of the first things that I DIYed in the process of wedding planning.  I knew I wanted something different, and Southern.

First, I saw pictures of Blake Shelton and Miranda Lambert's wedding and got inspiration from Blake's Southern cotton boutonniere.  You can see pictures of that on my First Blog Post.

I knew that I wanted to incorporate cotton accents in the overall decor of the ceremony and reception.  So, I went to Hobby Lobby and bought a branch of real cotton in the floral department. You can find it on their website here- Cotton. Be picky when you are looking at the different branches.  Make sure the cotton balls have a long enough stem to attach to whatever you are working with.

I also got a bunch of golden wheat while I was there.  I thought it would be fun to accent with that. You can find it on Hobby Lobby's website here - Wheat.

The coral colored fake rosebuds were something that I had previously bought in an assortment of branches and various vase fillers package.

Here's a list of what you will need for making these boutonnieres:


Directions: 

1.  Cut the cotton balls off of the branch.  Make sure you leave enough branch on it to use at bottom! 

2.  Hold the wheat behind the cotton ball to see how long you want the wheat to stick up behind it.

3.  Cut at desired length.

4.  Use the floral sticky tape to wrap the items together at the bottom of the stems, very tightly.

5.  Take the jute twine and the hot glue gun and start wrapping around the bottom of the stem.   Every wrap, put another drop of hot glue to help it to stick better throughout the whole wrapping process. 

6.  Cut the twine and add an extra dab of glue, if needed, where the twine was cut.  (Try to make sure it ends at the back of the boutonniere).

7.  Use whatever type of ribbon you want to use for a bow at the base of the cotton.  I simply tied it around the base and didn't have use any hot glue to attach it.  I used a jute/leaf type ribbon for the groomsmen boutonnieres and I used navy blue ribbon for Brad's.  I wanted his to be slightly different from the others.

8.  Use the pearl boutonniere pins to attach the boutonnieres to the suit.


Finished product!


The boutonniere's stood out more on my dad's black suit, versus the khaki suits that the groomsmen wore. 


Happy DIYing fellow Anxiety Brides!

xoxo


Thursday, June 4, 2015

The Wedding

Well, it's been a while since I've posted!  The wedding went PERFECTLY!  The weather was amazing and everything came together way better than I could have ever expected.   All of my DIY projects worked great with the theme of the wedding.

I will never forget, getting to the ceremony, and seeing how gorgeous everyone looked and thinking "This is really happening!  The vision that I had for the wedding looks amazing!"

I was so calm and relaxed the day of the wedding.  You would have thought I had taken every anxiety pill known to man!  Everything went perfect, and if something didn't, I didn't know about it.  So, just remember, it will all turn out wonderfully and the nerves will subside.

This was my face throughout the day.  haha


We only rented enough chairs for the immediate family to sit during the ceremony.  The rest of the guests stood around us for our short and sweet ceremony. 


The day before the wedding, my sweet mother in law and sister in law, and a few friends helped us decorate.  We used sheer tulle (purchased as curtains from Ikea) to swag from the ceiling. We used a staple gun to attach it at both ends.  We used white string lights from Hobby Lobby inside the tulle.  I also purchased wooden monograms for us, my parents, and Brad's parents and hung them on one of the wood beams.   This is also what we gave them for the parents gift.  


I always envisioned the bridal party sitting together at a long table.  I also wanted the family tables to adjoin this, but there wasn't an area that could accommodate that.  So, we had 3 family tables directly behind us.  


My mom made our wedding cake. It was chocolate pound cake, with German chocolate icing filling, and buttercream icing. (YUM!)  We also did various desserts in family recipes.  These desserts were favorites for family members who have passed away.   We put framed pictures of those family members beside their favorite dessert.  

Here is the finished product of the antique mirror frame that I turned into a chalk board.  
Here's a link on a tutorial for how I made the menu:

I made pallet Mr. and Mrs. signs for our chairs.  
Here's a link for a tutorial on how I made the pallet signs for the wedding:

I bought navy blue table cloths on Amazon (because it was cheaper than renting!).  I only used them on the bridal party tables, family tables, and the high top cocktail tables around the dance floor.  
I used wine bottles as candle stick holders.  
"Reserved for family" signs were printed off and used in small gold place card holder frames.  
90% of the flowers (hydrangeas) used for the wedding were picked the day before.  For some reason they were blooming at the end of October here!  Thank you Lord!  


The table that we used for our guest book was my Uncle's antique desk.  

We knew we wanted to incorporate my great grandmother's car into the wedding.   We used it as our "get away" car. 


The ribbon wands were a fun and different thing to use for our send off.  
Here's a link for the tutorial on how I made them:


 We had the BEST day ever!  We saved so much by doing a lot of it ourselves and being smart about what we spent money on.   It turned out even better than I could have imagined! 


Tuesday, July 1, 2014

Pretty Little Bracelets

I just started making these pretty bracelets last week and I am totally loving them!  My first attempt was quite interesting..  I almost poked an eye out with the wire and thought I was going to have blisters from holding the wire so tight.   But, after a few trial runs, its not as scary!


What you'll need to make these bracelets:

  • 20 gage artistic wire.  (You'll need to cut it into strips of about 4 feet for each bracelet).
  • A cup or glass (to wrap the wire around)
  • Large stone beads with a hole through the middle
  • Jewelry pliers or crimper


It takes patience, wire wrapping skills and a little elbow grease.  However, your finished product is just darling!


P.S.  Happy July yall!