Thursday, May 19, 2016

Easy Caprese Salad


I made this easy caprese salad for my mom's 60th birthday party.  You can find out more about her cuteness Kate Spade themed surprise birthday party here.


Ingredients 
  • Cherry tomatoes 
  • 4 mozzarella string cheese sticks
  • 1/4 cup balsamic vinaigrette dressing (use more or less depending on how many tomatoes you are using.  I typically just pour it out of the dressing bottle without measuring and just give it all a decent coating of dressing).  
  • 1/4 cup of fresh basil 
Directions

1.  Put tomatoes in a large bowl.  (Feel free to cut each tomato in half if you desire). 
2.  Cut mozzarella cheese sticks in about half inch chunks
3.  Drizzle the balsamic vinaigrette dressing across the entire contents.
4.  Using a spoon, toss the mozzarella cheese and the tomatoes together in the dressing.
5.  Cut or shred the fresh basil and garnish on top.  

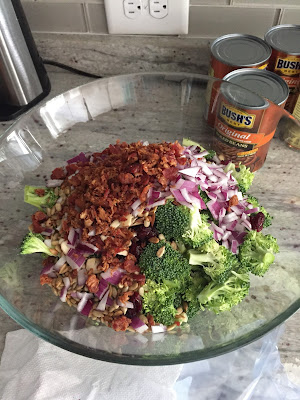
Broccoli Salad Recipe

I made this yummy broccoli salad recipe for my mom's 60th birthday party.  You can see more about her cuteness Kate Spade themed surprise birthday party here

Broccoli Salad Recipe


Ingredients 
  • 5 cups fresh broccoli cut up small
  • 1/2 cup bacon crumbles
  • 1/2 cup craisens
  • 1/2 cup sliced almonds
  • 1/2 cup red onion chopped very thin
  • 1/2 cup sunflower seeds
  • 1 cup mayo
  • 1/2 cup sugar (I probably use about 1/4 of a cup of sugar).
  • 2 tbsp vinegar
  • 1 tsp black pepper 
Directions

1.  Stir up all of the ingredients and enjoy!  I could eat this stuff as a meal! It is so good!

Mom's Kate Spade Inspired 60th Birthday Party


This May was my mom's 60th birthday and I knew that I wanted to make it super special for her.   I wanted to attempt to throw her a surprise party.  However, she and I are super close and I thought that there was NO way possible that I could actually pull that off!  I wanted to come up with the perfect theme too.  That's when I thought about doing a Kate Spade themed party.

A few years ago, we threw her a cruise ship themed birthday party.  You can find out more about that party by checking out the blog post here.

First things first, I created a board on Pinterest to pin different ideas and recipes.  I created it as a private board though, since I was throwing her a surprise party.  (I've changed the settings now.  So, feel free to check out the board if you want!)

Then, I created the invitations.  A lot of Kate Spade themed things have black and white stripes.  Like so:


But, I love the look of navy and white stripes  and came up with this design.  Blue is her favorite color and I also had a lot of navy blue things left from our wedding.  ;)


I just loved how the invitations turned out!  (I've obviously removed some of the information from the invitations before I added it to this blog.)  I created the invitations in Photoshop and found the precious downloadable flowers on Pinterest.  Here's the link to download these pretties for yourself - http://dlolleyshelp.blogspot.com/2016/02/free-watercolor-flowers.html

After the invitations went out, I knew that I wanted to stay with that same color scheme and theme. (Ha! That rhymes!)  

Here's a taste of the inspiration that I had for the party - 


The day of the party, she still had no clue!  Thank goodness!  She was very surprised that we had pulled this off for her.  


Bucket of napkin flower buds. 

I literally think this is one of the cutest napkin ideas ever!  I found the idea here and just had to try it.  It is SO easy.  Simply use a decorative bucket or bowl.  Roll the napkins and tuck them in the bucket and then stick fake greenery behind the napkins.  Easy and totally precious!  


I wish I had taken more pictures with my actual camera instead of my phone, but I didn't have time while all of the festivities were happening.  Thank goodness my sweet aunt captured most of these during the party.  


I also should have taken pictures of the food.  However, I did snap these while I was cooking and thought I would give you the recipes for an easy caprese salad and my aunt's broccoli salad. 


Easy Caprese Salad


Broccoli Salad


Monday, May 16, 2016

DIY Mantle Project

My husband and I were in desperate need to liven up our fireplace area.  I wanted a pretty decorative mantle that we could decorate for the holidays, and something that will hold the soundbar for the TV. I really liked the look of a rustic solid beam, but didn't want to pay hundreds of dollars for one.


We bought a decorative mantle at the Pottery Barn outlet, but when we started to put it up, I just wasn't in love with it.  It was too small for the space and it just didn't blow me away!

That's when I started searching Pinterest for ideas.  I came across this awesome blog - Addicted 2 Decorating.  This blogger shows you step-by-step how to create a rustic beam mantle simply out of a few wood boards.  For this project, she used pine boards, but my husband and I chose to use red oak. The choice is totally up to you, but we were really happy with the finished product.

(She gives you a very detailed description of each step with photos.  My husband I were pushed for time to finish this project before my mom's surprise 60th birthday party.  So, I was terrible and didn't take pictures throughout each step.)


Needed materials and tools for this project:
  • 3 pieces of  1' x 6'  x 8' wood of your choice (pick the straightest boards that you can find!)
  • 1 sheet of stain grade red oak or specie of your choice plywood 1' x 1' x 1/16 of an inch thick 
  • Wood stain of your choice (We used Minwax Dark Walnut)
  • Rag to apply the stain
  • Wood glue - Gorilla glue
  • Nail gun with 1 inch nails
  • Compound Miter saw
  • 220 and 150 grit sandpaper, palm sander, or sanding block
  • Things to distress the wood.  (We used screwdrivers, gravel, hammer, and chisels). 
  • Tape Measure
  • Level

Using the miter saw, we cut our wood boards the size to fit across our fireplace area.   Then, we used screwdrivers, rocks, a hammer, and chisels to carve out areas and rough up the wood to give it a more rustic look.  We then lined up one of the boards and used the nail gun to attach it to the flat "front" board.  Once we attached the other board, we had a shape like this - 


Image from - 

We used wood glue and went around the entire inside where the seams were, to give it extra hold. We also filled in any areas that may not have looked seamless from the outside.  Since we wanted this to look like one solid beam, we filled in any areas where the boards didn't meet together perfectly.

Once we had this shape created, we cut 2 pieces of the remaining boards to nail and glue into the empty ends.  To give the board a more seamless and wood beam look, we used the stain grade plywood to put on the 2 ends.  Therefore, you won't see any wood ends.  We laid the plywood on top of the ends to get the accurate size and using the miter saw, cut them to the sizes to fit.  After the two pieces were the right size, we used the nail gun and the wood glue to attach the pieces to the ends. We used sandpaper after it was dry, to round the edges together to give it a more uniform look.  

After the beam was already created, that's when we stained the beam.  The blog post that I got the directions from, stained her boards first.  I don't think there is a right way or wrong way to do this.  So, however you want to do it will work!  

I put about 6 coats of Minwax Dark Walnut stain on ours, because I wanted it to be very dark to match our kitchen cabinets.  I used an old t-shirt to apply the stain.   

Here's the finished product - 


(You could add decorative corbels to the bottom of the mantle if desired.  We just chose not to.)

We were thrilled with how this project turned out!  I would definitely recommend this project to anyone who doesn't want to spend a ton on a mantle for their home, but want to have something that looks like you did.  ;)  


Monday, April 18, 2016

I'm a Painter... Therefore, I should paint. Right?

Hello!   It's been way too long since I've had a chance to be able to share my new crafty ideas and happenings.  I thought I would show you the paintings that I've been working on.

When we moved into our new house,  our bare walls were in desperate need of some art.  However, after planning a wedding and building a house, we were definitely not overrun with money.   So, I decided to get creative and bought a few canvases at Michaels and used some craft paints that I've had for a while.  Then, I started looking through Pinterest for ideas.  That's when I came across this cool blog -  http://lifeonvirginiastreet.com/2014/09/year-of-change-septembers-project-2/

I just loved this abstract piece that she created and I decided to give it a try.  


This blogger walks you through the entire process of how she created this piece and made it super easy!  

She used the following colors:

  • Raw Umber
  • Kelly Green
  • Ivory White
  • Skyline
  • Light Periwinkle
  • Baby Blue

I didn't use all of the exact colors that she did, because  I was afraid that the Kelly Green might be a little too bright for what I was going for.  Above is a picture of some of the colors that I used and what brands of paint that I had.  These paints are really cheap and you can pick them up at any craft store, or even Walmart!


Here's the finished product in our bedroom.  


 I started with the dark colors at the bottom and blended up to the ivory at the top. 


I also decided to use the same type technique for a beach scene for our laundry room.  I simply blended in a sand/taupe color at the bottom and mixed in some ivory with that.  (I'll be honest, the sand color was a sample of interior house paint that we bought at Lowes!  haha)   Then,  I used the navy blue and faded it into a sage green color.   After that, I blended in baby blue with gray and faded it back with white.   I used the same 1 inch brush for both paintings.


These abstract paintings are super easy and fun!   Why not get creative and use whatever colors you are trying to incorporate into your living space?   Go have fun fellow Painters! :) 

Wednesday, July 15, 2015

My first attempt at #DIY Painting Furniture

When my aunt was cleaning out my great aunt and uncle's house, I was so excited to be able to have some of their furniture pieces for my new house.  Growing up, we were all very close and I knew I would cherish the opportunity to have some of their heirlooms.

First, there was a pitiful looking "behind the couch" table that was in their basement. I loved the overall shape of the table, but it was covered in dust and mildew.  I took the table home and scrubbed it with Lysol wipes until it was totally clean.

I went to Lowes and bought interior semi gloss Valspar paint in a very dark gray.  I actually didn't even prime this table (even though it probably would have been best to do that).  I simply started brushing the gray on the legs on the table and using a paint roller for the top of the table. After I started painting the table, I could see indentations in the top of it where it looks like people used it to write on at some point.  After my mom looked at it, she thinks it might have been my great grandmothers table, who I am named after.  That gave the table a whole new meaning to me!


It took about 5 coats of paint before the entire table was a solid color, 
but I was totally thrilled with the finished product!

Painting a China Cabinet

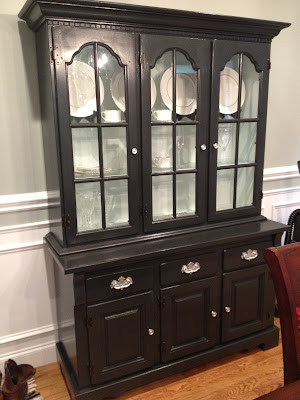
After I saw that the table went well, I started on the China cabinet.  The wood on the cabinet had just a normal stained wood finish.  It wasn't TERRIBLE, but it just wasn't what I had in mind for my dining room.  The pulls on the doors and drawers were also a very 80's bronze color.  (You can see both pieces of the China cabinet behind the table in the picture above).

The first thing I did was take all of the knobs and pulls off of the cabinet.  Then, I cleaned it inside and out with more Lysol wipes (These are always my go-to cleaning product!)  I also removed the glass from the doors of the China cabinet.

Once again, I did not prime this piece of furniture.  I would probably recommend doing that, if I were to do it all over again.  I had to put numerous coats on the China cabinet for it to look universally the same color.  I used the same interior semi gloss Valspar paint in a dark gray color for the entire outside of the of the cabinet.  I removed the drawers and used a paint roller to paint the front of the cabinet drawers.  I also used a paint roller for the sides of the cabinet and anywhere else that I could get by with using it, and for the other areas, I used a regular paint brush.

After I had the outside painted, I wanted to do something different for the inside of the China cabinet. So, I decided to go with a different color to contrast against the dark gray.  I had some of our master bathroom color left over that is a pale mint (Delicate Mist is the name of it).  I painted the entire inside Delicate Mist and once again, it took several coats of paint to cover it completely.


After I had the entire China cabinet painted, I knew that I did not want to put the dated bronze knobs back on it.  At first I thought about buying all new knobs.  But, I really liked the over all shape of the knobs and was probably going to end up buying something similar in a chrome or silver color.  So, I decided to be crafty with the original knobs.  My dad had aluminum/chrome motor paint in his garage, that he uses on his car projects.   I decided to just give it a try!  After I started spraying them, I fell in love with the color!  They look brand new and even look like they were made that way.


The Finished Product


Wednesday, July 8, 2015

Kids or No Kids? That is the question.

Is it okay to have an adults only wedding?


This has been a hot topic on social media lately.

When we got married on October 25, 2014, we decided to have an adults only wedding and this was a huge surprise to some friends and family members.  However, a wedding is an adult event.  Two people who love each other are joining their union in front of their friends and family.  Who wants an interruption during that?

On our wedding invitations, we simply added "Adult reception to follow."  This gave our guests the hint that children were not invited, and anyone who had a question about it, called us.  Honestly, the majority of our wedding guests with children were excited to have a date night with their spouse. However, we did have a few friends and family members whose feelings were hurt because of this.

Just because we asked for no children to be there, does not mean that we hate your kids!  I like children and Lord willing, I want to have children some day!

I've just always thought that children can be an overall distraction at weddings.
They cry during the ceremony...
They get in the aisle and walk around during the ceremony...  (Don't even get me started on flower girls and ring-bearers that stop in the aisle and cry for 10 minutes while every one thinks its just so adorable. NO.  IT'S NOT CUTE!).
They stick their fingers in the wedding cake...
Their parents aren't watching them...
They throw a tantrum when they don't catch the bouquet...  (I may have done this at my Uncle's wedding approximately 24 years ago)...
Nonetheless! They can often be a distraction from the wedding as a whole.

Some people suggest that you should offer childcare for the individuals who have children and want to come to your wedding.  My response to that is...  No! Weddings are EXPENSIVE to begin with. Why should I pay for a babysitter for your child or children?  We are already paying for your alcohol, meal, dessert, entertainment, and a gift (favors) for YOU for the evening.  So, no, I don't want to pay for someone to take care of your child too.

Don't get me wrong, if you want to have children at your wedding, that's ok!  It is YOUR wedding day and it is YOUR prerogative to decide what you want.  Just don't let someone make you feel bad for the decision you choose.

For us, it was the best decision we could have made!  If we offended anyone, I'm sorry.  We had our perfect wedding of our dreams with no distractions.  No flower girls.  No ring-bearers.  No interruptions.  No regrets!